Category Archives: Style Arc

Green Celine

Style-Arc-Celine5

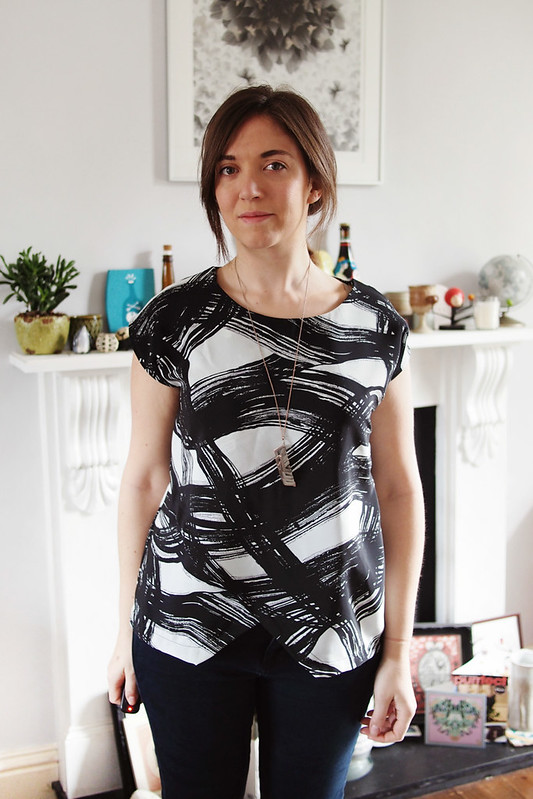
Well, hello there. What’s new? I got a new rug and tidied up my mantelpiece…

I’m sorry for a bit of an unintended extended absence round these parts lately. A lot of things seemed to collide at once in my life the last few weeks, such as:

– Two hellish weeks doing jury service. Honestly, if you get asked, run a mile!
– Work kicking up a gear, culminating in pretty crazy trip to Iceland.
– Lending my camera to my sister because she got a new puppy, and subsequently buying a new one jointly with Josh, which he promptly took on holiday with him.
– The turbulent news from my own country and the rest of the world generally not making me want to leave my bed…

Style-Arc-Celine1

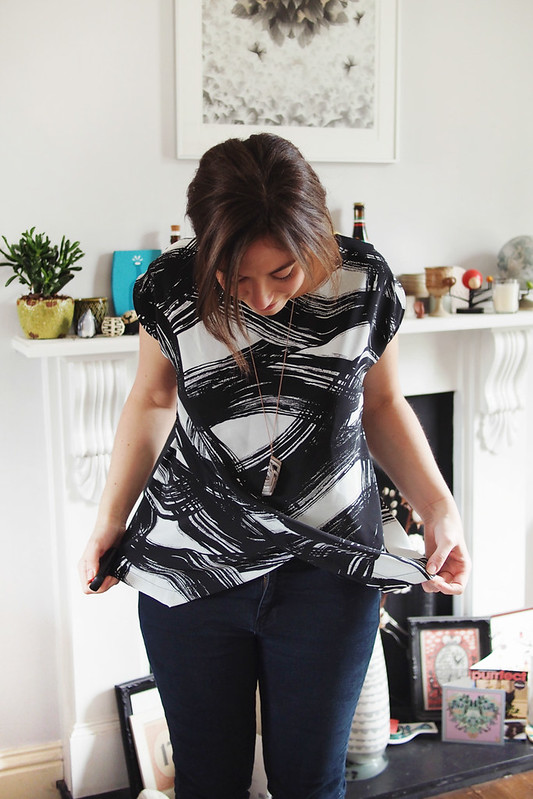
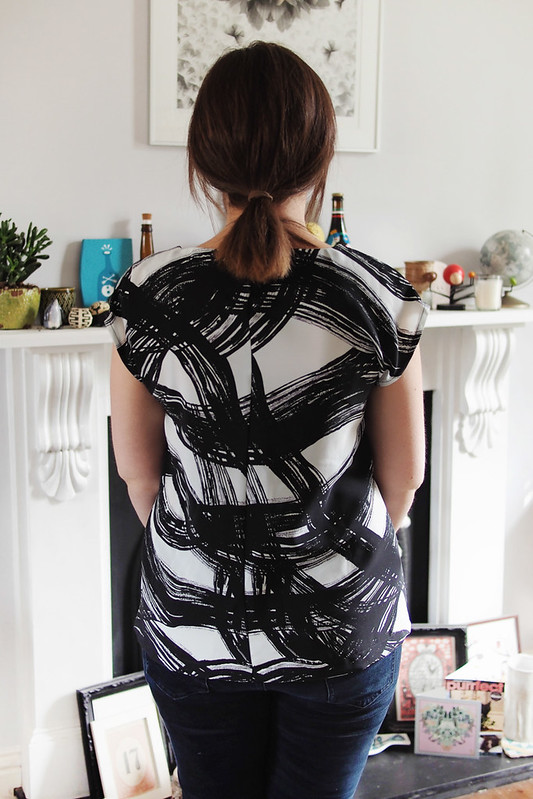
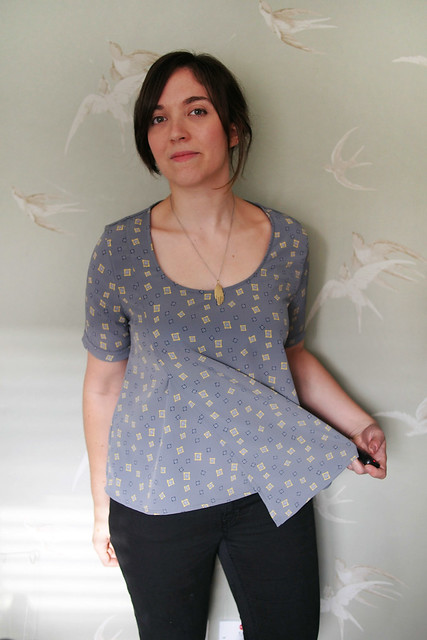
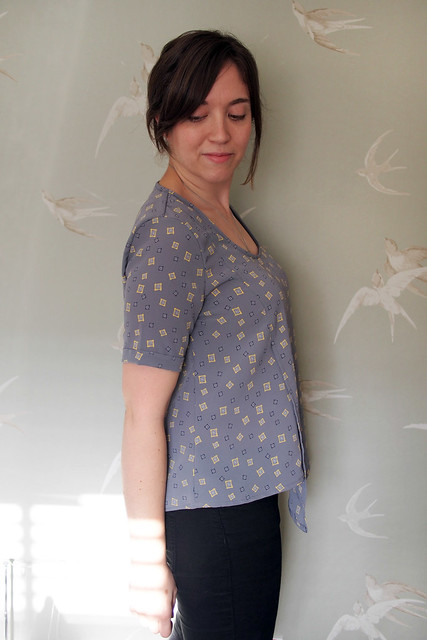
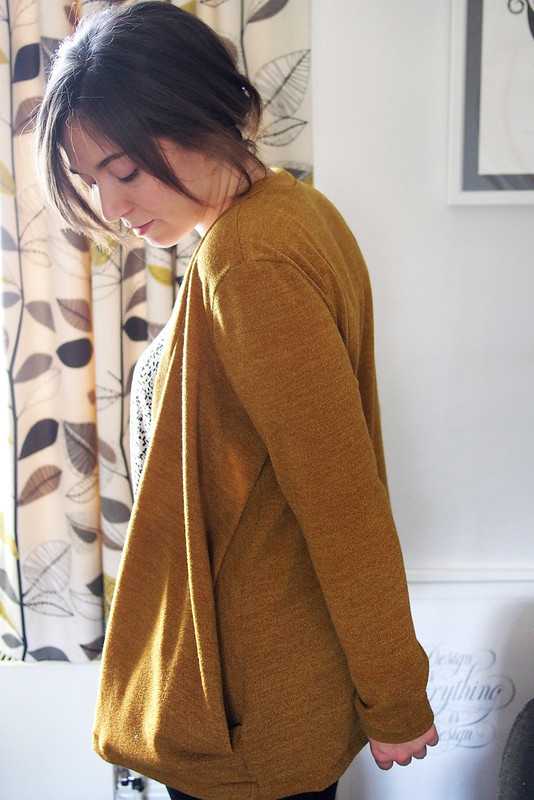
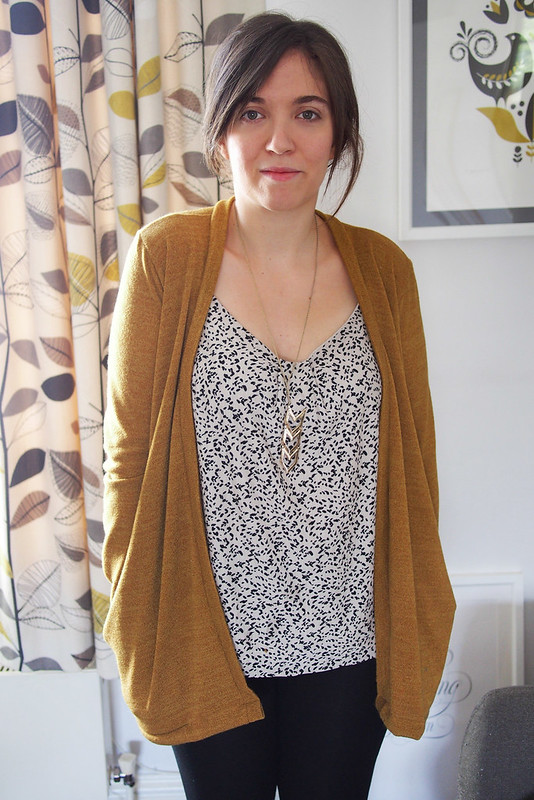
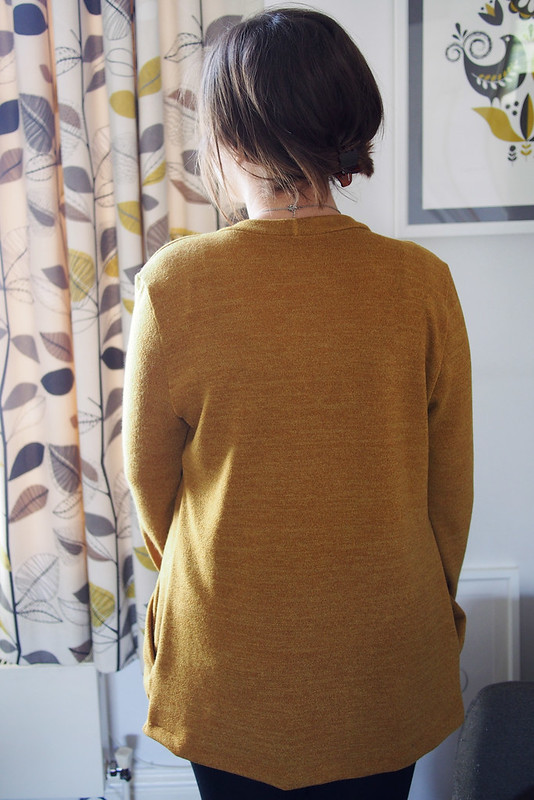
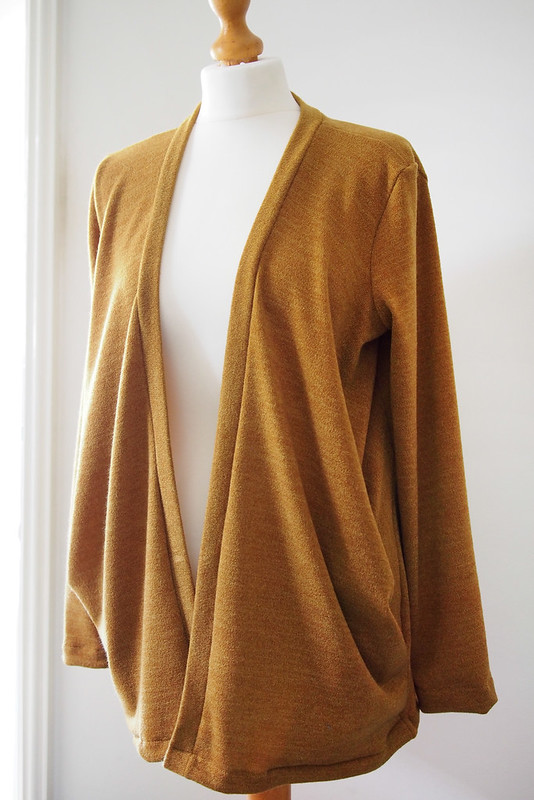
I have managed to fit in a bit of sewing though, if not blogging, so I have a nice backlog of projects to share. Starting with this, my new favourite dress. It’s green, it’s midi, it feels like I’m wearing a big comforting hug, and I love it.

Style-Arc-Celine

The basis for the pattern was the Style Arc Celine, though you’d be mistaken for thinking it’s the more famous Named Kielo, especially given the tweaks I made. I bought Celine over Kielo because I know how well Style Arc patterns fit me and they’re so very easy to work with: one pattern on the sheet, nice paper, easy to cut, seam allowances at the ready. Also it came with optional short sleeves which I wanted, though I think Kielo has a free extension pack for sleeves now too.

Style-Arc-Celine3
Style-Arc-Celine2

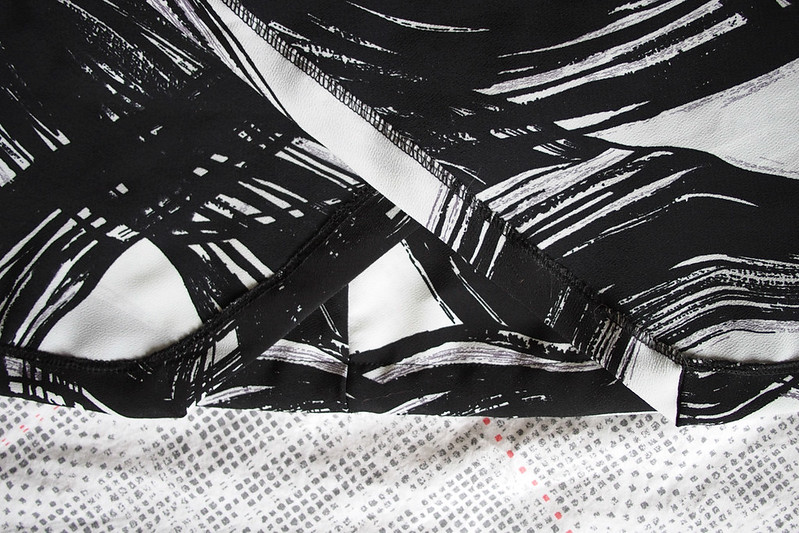
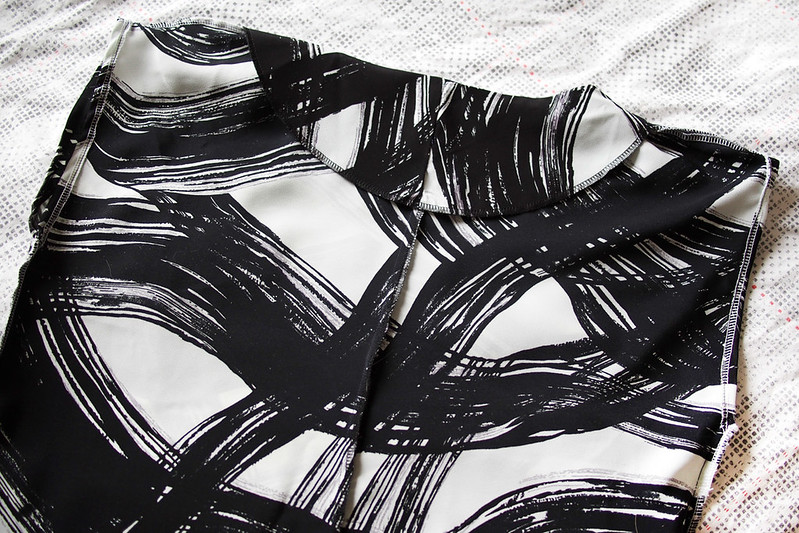
So I basically hacked the Celine to make it look more like Kielo: adding 6 inches to the length and straightening out some of the skirt’s flare; adding extra-long skinny ties onto the wrap sections; and merging the front and back princess-seamed panels into single front and back pieces. (There is some shaping built into the seams, so for a woven I’d use the panels; for a knit I thought it was safe to simply overlap the excess where the princess panels curve outwards.) There’s loads of ways to tie the dress to get different looks, but I think the most flattering on me is a crossover at the front with the ties knotted at the back.

Style-Arc-Celine4

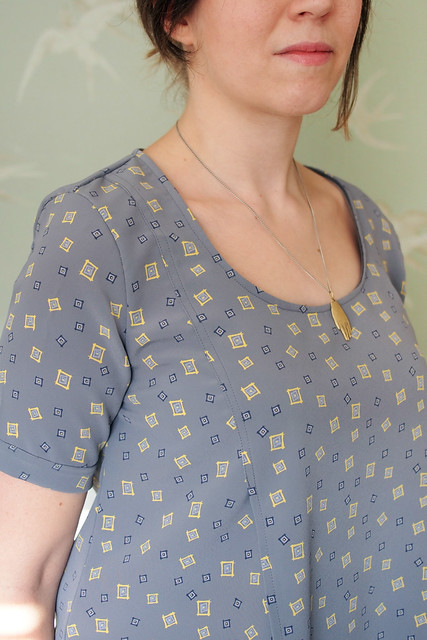
Knits aren’t amongst the recommended fabrics for Celine, but I didn’t change anything else except switching the neck facing for a band. The fabric is a ribbed knit from MyFabrics. My god this fabric is lovely: yes, it’s polyacrylic, but it’s £3 a metre, snuggly soft, and comes in loads of colours, so I might be snapping up more. It was painfully difficult to cut – my rotary cutter was going NOPE over all the ridges, plus the pattern pieces are huge and awkward so I had to move from my sewing room onto the kitchen floor to have enough space. But once cut it came together quickly and was easy to work with, even the hemming, which I was slightly dreading but came up lovely using a walking foot.

Style-Arc-Celine6

It’s a dress that attracts a lot of comments and compliments, yet it’s secret pyjama comfortable, which is really my preferred criteria for clothing and why it’s amongst my favourite garments right now. I’ve worn it on a flight, to work, it’s cycle friendly, and I’d feel fine wearing it out in the evening too: not many styles you can say that about.

Back soon with more! How have you been?

Autumn capsule: Style Arc Ethel

bloglovin

Firstly, please forgive me a little YAY – I won the Bloglovin’ 2015 award for Best Sewing Blog. I’m honestly amazed: against all the incredible blogs out there, never mind the other nominees, it’s a big surprise to be noticed and recognised like this. Thank you so much if you voted for me, and thanks even if you just visit and enjoy reading. Being able to share my garments and process makes sewing all the more enjoyable for me, so it’s great to have a little extra encouragement to keep on doing it.

Style Arc Ethel

So, it didn’t take long to get cracking on my autumn sew plans – I made this top on the Sunday right after I posted about my plans. A nice easy one to kick off and looking satisfyingly similar to my sketch, this is the Style Arc Ethel top in cream cotton ikat from Offset Warehouse. (I’m told this fabric is now only in stock in Fabrications, so sorry if you wanted to find it online – they have lots of other lovely organic cotton ikats, though.)

Style Arc Ethel

I trend to trust Style Arc’s drafting and fit on myself to cut their patterns straight into my good fabric, and this was pretty good out of the packet. It’s boxy and loose fitting (about 10″ ease in the chest in the size 10) but I think the design lines make it pretty flattering. I scooped out the neckline a bit as the stripes seemed a bit overwhelming on the higher neck – as you can maybe see, that caused a tiny bit of gapeage so I’ll correct that on the flat pattern for next time. Also there’s an annoyingly uneven stripe right at the neckline which makes the neckline look slightly wonky – I swear it isn’t, ha ha.

Style Arc Ethel

Due to my quite thick fabric, instead of using the included topstitched facings around the neck, arm and hem I just did a bias facing for the neck and plain hems. But in a lighter fabric I’d definitely like to try that detail next time.

Style Arc Ethel

I cut the side panels slightly off-grain so they’d follow the diagonal front seams, and I like the resulting chevron effect at the sides and shoulders. It does appear to tip up just a bit at the front, I am not too sure how to correct that.

Style Arc Ethel

Handily for autumn, I love how this looks with a cardigan, the diagonal seams poking out at the top. As planned, the cotton is breathable yet cosy, and it just needs a shake when it comes out the machine to get the wrinkles out. Which is good, as I can see it getting worn and washed an awful lot. Up next from the plans, I finally picked a jacket pattern for my grey crosswoven cotton, so watch this space…

Style Arc Fern

Thanks for your comments on the last post, really interesting to read about how everyone else got into sewing!

Style Arc Fern

So, I’m proud of myself here: I made a top when I had ample fabric to make a dress instead. I’ve mentioned before that I have a weird tendency to feel like I need to make a dress when I have enough fabric to do so, so it’s a real internal struggle to ever make ‘just a top’ from a 2m length of fabric. SILLY. Anyway.

Style Arc Fern

This is a Style Arc Fern top, which came to me because Amy got it as her order freebie and kindly sent it on to me. It’s a rather cool kimono-sleeved top with a double-layered front which end in mitred corners. A bit of an update on the Elizabeth that I’ve sewn a couple of times already. The fabric’s a cheap polyester crepe from eBay, which is why I didn’t mind sacrificing it to a top instead of making a frock.

It’s been said before about Style Arc: the styles and drafting are amazing; the instructions are diametrically terrible. Now I don’t mind minimal instructions but Style Arc ones seem to be written purely to fox you, with terminology frequently mixed up or flat-out wrong (‘stay stitch’ is used interchangeably with understitch and baste in this case) and pointers to refer to diagrams that really don’t make things any clearer.

Style Arc Fern

This top has a few interesting details which meant I was puzzling over the construction quite a bit. There’s the mitred seam at the centre fronts, which took a few minutes of head-scratching to figure out but turned out to be quite a neat method to get a sharp corner.

Style Arc Fern

The front neckline is finished by sewing the overlapping fronts RS to WS and flipping over, while the back neck is finished with a facing. To get a clean finish at the neck edge you sew the outer front layer’s shoulder to the back shoulder RS together, then continue to sew the inner front shoulder to the back facing. Makes sense NOW but very much didn’t at the time. Also if your fabric looks similar on the back like mine does, mark which is the front or you might sew the shoulder inside out first try. Ahem.

Style Arc Fern

There’s supposed to be a little keyhole split at the top of the back neck: I had a valiant stab at it but had to give up and sew it shut as I simply couldn’t get it looking right by following the directions. After that I gave up with the instructions entirely and made the rest up as best I could.

Style Arc Fern

Can’t argue with the fit though, which is perfect right off the pattern. The shoulders of SA patterns seem to fit particularly nicely on me and the length, darts, neckline etc are all just so. It’s a really useful, wearable top, great for work with skinny jeans. I suppose I’ll just have to muddle through and make another one some time!

Autumn planning: Coco-Sandra

Jeans

The weather has been so uncharacteristically lovely in London that it’s really hard to start thinking of autumn sewing – I haven’t even packed away the summer dresses just yet as it’s still in the low 20s (70s to you ‘mericans). Nonetheless I have started identifying wardrobe gaps and sewing up some things to cover them. I think this outfit is basically what I’ll be wearing from November til April: a Tilly Coco with Style Arc skinny jeans.

Jeans

The Coco first: I cut a size up from my previous ones for a more slouchy feel, teamed with the three-quarter sleeves and an added draped front pocket (cut with sloped sides but sewn in a straight vertical line, if that makes sense). The fabric is a stashed remnant of a fairly thick, very stretchy jersey. It’s all overlocked together and the hems are all just turned back and stitched with lightning stitch: a two hour jobby.

Jeans

The jeans are my third go at the Stye Arc Sandra – after a too tight and too loose pair, these are pretty great. I made up them in a brownish stretch denim I got in Ecuador.

Jeans

The sewing process, to be honest, was not particularly fun. The fabric didn’t want to press at all and topstitching was painful… I tried using a proper topstitch thread and needle and it wasn’t happening at all. Don’t even talk about twin needling. Hence the topstitched detailing ended up pretty, ah, minimal – I didn’t even do the leg or crotch seams, and the waistband is stitched with non-matching regular thread. Meh.

Jeans

The fit around the waist and hips is great, but there are some odd drag lines going on around the back knee. Honestly, you fix one problem and another pops up.

Jeans

I was determined to get a really nice non-sagging, non-creasing waistband this time. I interfaced both the inner and outer bands with a good quality medium/heavy interfacing from Ray Stitch which seems to have done the trick. The one bit I often seem to mess up is the very centre of the waistband ‘winging’ upwards at the top corner, creating a messy overlap when buttoned. Hence I added two buttons to keep it from flapping.

Jeans

The front fly is my tidiest yet; I incorporated the fly facings onto the front pattern pieces and used the directions from Burda 7017 which are definitely my favourite (though I’ve been meaning to try this method which looks even easier).

Jeans

I even managed to correctly sew the pocket yokes into a Spanx-style extension that goes all the way to the zip. It’s been nice to dip back into jeans-making after a spate of sewing frocks. I need to bash out a couple more pairs as I’ve chucked out all my ill-fitting RTW ones!

80s Style Arc Elizabeth

Style Arc Elizabeth top

Just a quick one, a fun Friday afternoon sew to wear this weekend! This is my second version of the Style Arc Elizabeth top (here’s the first).

Style Arc Elizabeth top

I don’t have much else to say about the pattern – it’s a great fit on me and the crossover front makes it just a bit more interesting to sew and wear than a regular woven tee. This time I shortened the body by about an inch all round and scooped out the neck even more, just for a slightly different look.

Style Arc Elizabeth top

This rad fabric came via eBay for just £2! – it’s a poly crepe de chine and the pattern reminds me of an 80s duvet cover pattern. It was definitely earmarked for a top as I think it’d be a bit much for an all-over dress print.

Style Arc Elizabeth top

The neckline is finished with bias, and you can see here I’ve tacked down the top layer using a parallel line of stitching, to just below the bust. The sleeve cuffs are pressed to the front and hand-slipstitched down, and it’s all French seamed. Yummy. I finished it in one session today and now we’re off to the cinema together. Happy weekend all!

Style Arc Simone cardigan with White Tree fabric

Style Arc Simone cardgian

I’m very behind on photographing and sharing finished projects again (the old work effect, sigh), so this snuggly cardi is no longer very seasonally appropriate thanks to the lovely London sun we’ve been having lately. But it’s still a handy wardrobe builder and great for throwing over a dress or cami when the temperature dips. It’s a Style Arc Simone cardigan in Warm Jersey, which was kindly sent to me by White Tree Fabrics.

Style Arc Simone cardgian

I was going to make another Julia initially but decided to try the Simone, mostly because pockets. I’m – eh – moderately happy with the pattern. I agree mostly with this Pattern Review post that the drape is not like how I expected from the diagram. It hangs very heavily and rather sticks out around the hips, one place where I really don’t need any extra weight! The pockets are made by sewing a large dart in the front then folding it to the side seam, so you have six layers folded up in the hem which obviously makes it quite bulky. A lighter knit that the one I used is recommended, so maybe that would help. The instructions are typically brief but easy enough. There’s one error to be aware of: you need to cut two neck binding bands and seam them at the CB (the instructions have you cut only one which obviously isn’t long enough).

Style Arc Simone cardgian

Chunky pockets aside, the fit it pretty good. It’s a bit longer than I expected, ending below the bum on me when I was hoping for mid-hip. You can’t shorten it from the hem because of the pockets, so next time I would take a couple of inches length out from around the waistline.

Style Arc Simone cardgian

The Warm Jersey fabric is a finely-knitted poly/elastane mix with a heathered effect from different coloured strands. Isn’t the colour just gorgeous? It matches both my living room and my blog! It comes in more scrummy muted colours too – red, brown, grey, blue (and Erin just used the richer aubergine purple for a hoodie). As the name suggests, it’s very soft and cosy and has a beautiful drape. I definitely snuggled in it like a blanket while deciding what to make it into. It was also great to work with – my overlocker and sewing machine both loved it. Despite being a proper knitted-looking knit it doesn’t fray or get fluff everywhere and it’s sturdy enough to not stretch all over the place when being cut and stitched.

Style Arc Simone cardgian

Style Arc Simone cardgian
The fabric behaved beautifully for the neck binding and I love how polished it looks – almost like a slim blazer lapel. There’s clear elastic in the shoulder seam to support the weight. One more change I would make next time is to hem the main cardigan before adding the neckband with the short edges pre-finished, because it feels a bit odd to me to have the hem going right over the band.

Style Arc Simone cardgian

I think it looks best on me with the pockets shoved to the back, not hanging around the front in its slightly weird trapezium-shaped way. It will definitely get plenty of wear this summer and beyond, and I might make it again with the fitting tweaks I mentioned as I do like the style. Obviously, the grey warm jersey is calling my name for next time.

whitetree

Oh, and I almost forgot! White Tree Fabrics also gave me a 20% discount code and free shipping offer for everyone, just enter code WHATKATIESEWS at the check out. Happy shopping – I’m eyeing up lace and broderie for my next project…

Thank you to White Tree Fabrics for supplying the fabric; views as ever my own.