Category Archives: Finished items 2017

Ombre Freemantle


It’s been quite a long time since I tackled a coat project (and got outside for a photo shoot!). My Yona coat has happily seen me through two winters and it’s actually still good for this year, but I also fancied a new option. Once I clocked this awesome fabric and realised what an amazing Marilla Walker Freemantle coat it’d make there was no going back.

I actually first attempted this pattern back in 2014, soon after it was first released. Shall we say my skills did not match up to my ambition back then and the WIP wound up skulking on my mannequin for a long time before getting ditched. It’s a fairly advanced pattern to construct, especially as written with the insides underlined and bias-bound rather than a bagged/enclosed lining, and the cut-on square underarm gussets to wrap your head around. Marilla has actually discontinued the pattern from her shop as she felt the construction was too challenging to be saleable, but I’m sure she’d sort you out if you asked. Also word is she’s releasing some new patterns soon… :) EDIT TO ADD: Marilla is reworking this pattern to include a standard sort of lining, so keep your eyes peeled for the re-released pattern this side of Christmas! Great news, and would have saved me some head-scratching!


I did actually alter the pattern to have a standard lining, which is not that straightforward to do – it was one of the things that tripped me up on my first attempt in fact. The difficulty comes because the main body has raglan construction whereas the facing just has shoulder seams, so you can’t simply deduct the facings from the main body pieces to end up with the lining, if that makes sense. Marilla does have a tutorial on it, but it still didn’t click for me! Instead I made the lining as an exact dupe of the outer, then topstitched the facings on top (binding the raw facing edge with bias before doing so) and finally trimmed back the lining from underneath the facing parts. I then cut the inners down by two inches to form the jump hem and used a mix of the Yona coat instructions and this Grainline tutorial for a refresher when it came to machining it all together. Sounds complicated but still easier than making a neat job of all that binding in the underlined version, ha ha.

The star-of-the-show fabric is a very dreamy grey ombre wool and mohair coating from Fabworks that I totally bought with the Freemantle in mind. I knew that placing the stripes nicely would be key so bought 3m and mocked up some options in Photoshop before deciding on my cutting layout. The fabric was as wonderful to work with as wool always is, taking a steamy press beautifully, and I love the fuzzy halo that the mohair gives it. It’s quite lightweight and drapey yet incredibly warm and cosy. I’ve been wearing it as a coatigan indoors as well as out as it’s so soft and unstructured. I did apply interfacing strategically but may go back and add some twill tape along key seamlines as I’m a bit nervous of it stretching out with wear.

I’m especially proud of the welt pockets. It’s always terrifying making that big slice into your garment front, but these turned out so nicely and they feel really roomy and practical – plus the inner facing is in self-fabric so they’re all snuggly on my paws. I had the giant copper snaps in my stash, I think they’re from Macculloch and Wallis in Soho. I only had two but three would really be better, though I don’t think I will wear this closed very often anyway.


Little details of the collar and that underarm gusset, which is rather fun to sew, especially seeing the gradient fabric wrap around it. I wound up sewing the collar twice as the first time I got it backwards, and then I realised I didn’t like the placement I’d done so re-cut it in a darker area. I also interfaced it the second time, which made it easier to get nice crisp edges.


The motivation to complete this project came just in time really as it’s suddenly got a bit chilly here in London. I wore it out for dinner literally as soon as I did the last handstitch on the snaps as well as out the next day, so I reckon it will be on regular rotation this winter. Is anyone else planning a new winter coat? Word is Grainline is releasing her personal pattern for this dreamboat, so this might not be my only coat project of the season!

Iceland meets Kyoto

This was a fun wee project! Contrado, a London-based print on demand factory which I visited a while back, recently gave me some budget to make a new pattern and have it printed on whatever fabric I liked. Luckily I’d just returned from a quick holiday to Iceland, and being up on a glacier really reminded me of fabric prints – Liberty’s Manning springs to mind, which was literally also inspired by glacial landscapes. Here I am on said glacier and some of the pictures I took which acted as print-spiration:

I followed this tutorial to create a repeat pattern from one of my photos, and the file below is the one I entered into Contrado‘s online tool, from which you can set up scale and repeat styles.

I chose the Vintage loop-back sweatshirt fabric, a cosy and stable knit with an off-white base, a poly front side and cotton looped back. I was super pleased when I received the fabric a week or so later, it looks just how I imagined it and apart from a slight chemical smell that dispersed in the pre-wash you’d think it was any regular printed fabric.

I sewed it up into a Papercut Kyoto sweater, minus the cute sleeve ruffles, as I thought a simple sweatshirt would show off the print the best, and I only had 1.5m to play with.

Not a lot to say about the construction, it was super easy and the only fitting amend I made was to shorten the body and sleeves by a couple of inches each. This sort of drop-shoulder style isn’t really the most flattering on me to be honest, but for a cosy sweatshirt I don’t really care!

The fabrics I had printed through Contrado over a year ago are still holding up super well with repeated washing, by the way – I still wear my emoji Inari and Olivia dress a lot, so I was pleased to have the opportunity to get some more made, and end up with a cool wearable holiday souvenir. Thanks Contrado!

Lovely Lander

I made up True Bias’ new Lander pants pattern last weekend. I was sort of disappointed when I first finished sewing them, but a few little tweaks and I’m really digging them now.

I originally made these up in the full length, which is what threw me off knowing if I liked them or not. I was really hoping to like them in full length as I’m not sure how to translate my many pairs of cropped pants into the winter, and I find my previously-trusty skinnies really uncomfortable after a summer of breezy culottes! But alas, in the full length I couldn’t shake terrible 90s connotations of bootcut pants, especially in black as they reminded me of trousers I had to wear when I waitressed… they didn’t actually look awful, but I tried on a few pairs of shoes to test the styling and just couldn’t imagine wearing them much. So I took a few inches off and they were transformed into something I’m much more comfortable with.

The Lander’s key features are delightfully practical roomy patch pockets plus the exposed button fly, which as well as looking super cool was pretty fun to construct. Much easier than I was expecting and much more straightforward than a zip fly, although if you noticed I did manage to sew it backwards (a mirror image to what it should be), doh. You do end up with a lot of layers and seam allowances sandwiched in there, so it was a bit tricky to make the buttonholes and finish the waistband edges neatly. Next time I may cut-on the fly underlap to the front pant piece to reduce one of the seams.

I used some sweet rose-stamped jeans buttons that I’ve had kicking around for a while. They were cheap and don’t feel 100% secure, so I’m a little worried one might pop off at an inopportune moment. I did give them a good tug and they held out on my first day’s wear though so fingers crossed.

I cut a size 8 and did some pre-adjustments to the pattern before cutting my fabric to suit my shape: a full butt/thigh adjustment and switching the straight waistband for a contoured one (I think Kelli is going to cover this adjustment in the sewalong). The pattern features a generous 1″ seam allowance for the outer leg seams so there is opportunity to further fine-tune the fit through the hips at the sewing stage, which is a very nice touch. (Being me, I barely glanced at the instructions so missed this salient point, then got really confused when the waistband didn’t fit on, ha ha.)

Fabric-wise I used a very lovely selvedge denim from Ditto Fabrics that I grabbed from the shop on a daytrip to Brighton a few weeks ago. This denim feels beautiful quality – excellent for the price – and has slight stretch with good recovery. Because the inseam is straight I could use the raw selvedge edge, and I overlocked the other seams in matching white and pink thread.

In short: digging this pattern! I really like the fit I ended up with so I may do some little hacks on these in the future, and probably make the shorts version if I get somewhere warm on holiday soon.

More Landers out there: Marilla Walker, Meg, Handmade Frenzy, Dandelion Drift

Bamboo Sahara

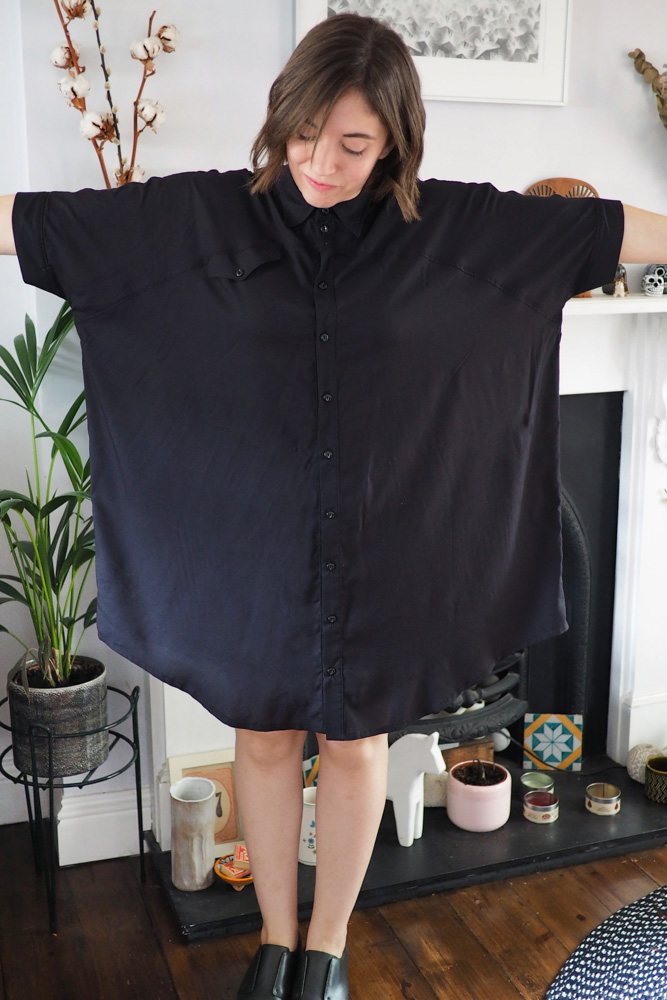
I’m a bit late for the Sewcialists’ Tribute Month, but this garment was very much inspired by Shauni of The Magnificent Thread! It’s a Ralph Pink Sahara shirt; Shauni has made two beautiful versions and slowly coached me into buying the PDF.

This was my first time sewing a Ralph Pink pattern, and it was a largely positive experience. The PDF layout is a little different to usual but once I figured out which markings to match it went together easily. The instructions are well illustrated but a little brief in places so a beginner may struggle, but this pattern is fairly standard shirt dress construction so I found it fine. 


The Sahara is obviously very oversized so I cut a size small without toiling and I’m pretty pleased with the fit. The only adjustment I did make was to take an inch off the hem length and slightly level off the dipped hem in the back. I did notice that my side seams are buckling a bit; I’m not sure if I got something a bit off-grain or the slightly bulky seams under the arms are causing it to drag a bit.

Collar open… I think I prefer it fully done up.

Having not sewn for a while I went to town with the finishing and used a mix of French and flat-felled seams throughout: no overlocking in sight. I also topstitched along the main seamlines to bring out the cool curved yokes on the front and back. Even so, I got the whole dress finished in a day of fairly leisurely sewing, buttonholes and all (I’m that weird sewist who actually enjoys sewing buttonholes…)

I especially adore the fabric I used which was a perfect match for the pattern: it’s an organic woven bamboo from Ray Stitch. I’ve never seen woven bamboo fabric before but it has the same silky smooth hand and soft drape of bamboo knits and was a dream to work with, taking a press beautifully and easy to manipulate around the curved hem yet still pretty stable so easy to handle. It has an almost sanded/peached finish and doesn’t seem to crease too badly. I used a size 60 microtex needle to make sure it didn’t snag. I might buy up some more of this fabric in white and try dyeing it as it’s basically dream dress fabric.

I feel rather like a fashionable bat wearing this, and I’m pretty into it! Needless to say, it’s insanely comfortable and being basic black it’s going to get a ton of wear. Much as it pains me to consider autumn weather, I feel like this’ll work great with tights and boots as the temperature dips. I feel like it’d work well worn open as an overshirt too. I’ve just got a new job after a summer contracting and having some delicious time off, so it’ll be great for work too.

More Saharas: Self-Assembly Required, Paprika Patterns, Frock and Sew, and of course thanks again to Shauni for the main inspiration!

P.S. If you’re reading in a reader, I gave my blog a bit of a fresh look – click on over to have a look!
P.P.S. If you’re not on Instagram, you may have missed that I was a guest on Helen and Caroline’s excellent new podcast, Love to Sew, talking about my sewing and blogging journey. You can find my episode here or on all podcast apps.

A wedding New Look

I made this a little while ago, wore it to a wedding, and completely neglected to get photos – but I dug it back out to photograph with no occasion whatsoever, as I think it turned out so nice it needs sharing!

I used New Look 6499 with a few of my usual little tweaks. I think it’s one of those dresses that looks rather fancy but was actually delightfully simple and fun to make, however I did put a bit of effort into preparing the pattern before cutting my fabric. I pre-empted some neckline gaping by rotating out a dart, which I converted into making the whole dress more flared/full than the gentle A-line as patterned. Here’s a quick video that I made of this process which I posted on my Instagram stories:


(Click through if you’re reading in a reader and can’t see the video above.)


I also added some side slits, and made a simple waist tie to draw in the fullness. All the tweaking was worthwhile as the fit turned out great and it was super comfortable.

I did find the instructions given to add the little sleeve flounces disappointing. Firstly you are instructed to hem the highly curved edges using a 3/8″ hem allowance: LOL NO, not going to happen. I overlocked the edge and used that as a guide to turn in once and make a baby hem which only just worked out ok with a judicious use of steam. For a nicer finish I think it’d be a good idea to self-line the flounces, especially if the fabric has an obvious wrong side like this one does. Also the flounces are just tacked on by hand at the end of the sewing process; I think it’d be neater if the corners were extended a little and they were caught in the seam that joins the strap to the bodice. I’ll do that next time. However this does mean I could unpick the flounces if I get bored of them!

The fabric is my buy of the year so far: it was from a random little shack-shop (with a kitty!) on Ridley Road market in Dalston and was a ridiculous £2 a metre. I bought six metres in excitement and passed some on to Amy. It’s a heavy polyester crepe and I’m in love with the swishiness and print (which is not dissimilar to my Atelier Brunette Cassiopee!). Wedding season seems to be over for us now, but I’ll definitely dig this back out for future occasions.

Cassiopée in Atelier Brunette

This is a double-French dress: both the pattern and fabric come from companies français! It’s also a little out of my normal style zone, but I think I love it.

It’s my second I AM Patterns Cassiopée dress – I made a winter version in a dark floral with long sleeves last December which I wear a lot, so another version was always in order. When I saw that I AM released a free short sleeve extension pack it was time to give it another go.

The sewing is really fast and easy: four raglan seams, bit of gathering and hemming and you’re done. The new short sleeve has a very deep self-cuff which you can either turn back or wear as-is, which comes to roughly elbow length on me. I like it both ways!

A few people have asked me and yes, the Cassiopée has a LOT of ease built in: this is actually the size below my measurements. A fluid, drapey fabric is essential so it doesn’t stick out like a circus tent. I don’t actually use the pattern pieces for the skirt as it’s just a big rectangle. I basically used up the rest of my fabric this time and made it really quite voluminous: the hem measures about 90 inches around. (I swear the hem isn’t puckered like it looks in the photos: I’m going to go back and press it again!)

The wonderful fabric that’s making me feel like a baby marshmallow is Moonstone pink viscose by Atelier Brunette, which I got from Maud’s Fabric Finds. As well as being a beautiful colour and print, this fabric is the perfect weight for dressmaking projects: floaty and light but with a little bit of body to make it more stable than some and pretty much opaque. I don’t think I can resist buying the blue colourway, as well as some of the other beautiful prints in this collection.

I French-seamed the entire thing and it’s one of those garments that I think is quite lovely as an object as well as clothing. It’s been hanging up in my sewing room for a while pretty much as decoration, though now it’s photographed it’s definitely going to make its way into my wardrobe.